Blood, Sweat, and Sawdust

Going against the grain

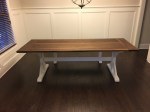
Finishing the Farmhouse Table

I love working on big projects like the farmhouse table.  However, my shop is small and the table is large.  It takes up a lot of space, and I am unable to work on anything else.  So, I was anxious to finish the farmhouse table and deliver it to the customer.

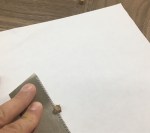
The customer wanted a white base.  So, the base received three coats of white paint.  Due to all of the nooks and crannies, I found that a paint brush was the easiest way to apply the paint.  Unfortunately, this was quite time consuming, but it got the job done.

A dining room table not only needs to be attractive.  It also needs a durable finish.  Consequently, I applied three coats of poly-urethane.  I used a simple wipe-on poly, that could not have been easier to apply.  Each coat only took a matter of minutes to apply.  If only I didn’t have to wait 2-3 hours between coats.

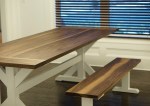
With the finish applied, I delivered the table and bench to the customer.  I kept the table top and table base separate.  This allowed us to move it through the front door quite easily.  Once in the customer’s dining room, I assembled the table and took a few pictures.  I think it turned out great and the customer was very happy.

I really enjoyed this project, but I’m glad to have my shop back.


Making the Farmhouse Table Base

The client wanted the farmhouse table base painted white.  As a result, I didn’t feel that expensive lumber was necessary.  However, I didn’t want to deliver them something made from construction lumber.  After some contemplation, I decided on poplar.

Poplar is inexpensive and my lumber yard carries many wide, knot-free boards.

I assembled each end of the base with dominoes.  This allowed me to assemble each end quickly and accurately.  Unfortunately, I only have access to the DF 500.  As a result, I wasn’t able to easily create the large mortises for the long stretcher to join each side.  The center column of each end is 3 1/2-inch by 3-inch and the DF 500’s fence just isn’t large enough to center a mortise on such a large piece.

In the end, I cut the mortises with a router jig.  I cut the tenons for the long stretcher on the table saw and trimmed them up with hand tools.  I’m not used to cutting tenons on pieces this long.  Consequently, I moved a few tools around to create enough clearance for the stretcher as I ran it across the table saw.

Before gluing anything up, I test fit everything together.  You don’t want to run into any issues after you’ve applied glue.  Then, I cut bevels on the short stretchers and use the dado stack to cut “feet” for the bottom stretcher.

Next, I glued each end together.  I ended up only needing a single clamp per end.

Finally, I glued up the complete base assembly.  Unfortunately, I don’t have any clamps long enough to secure the base.  So, I drove everything together and ensured that everything was square.  Then, I kept everyone away from it for the next hour.  The base is stable enough to stay put unless someone bumps into it pretty hard.

With the farmhouse table base complete, the only thing left to do is secure the top to the base and apply finish.  Into the home stretch!…

Click here for more on the Farmhouse Table Series


The Walnut Table – A Tabletop with Breadboard Ends

The concept of breadboard ends fascinate me.  Not only do they add style, but they also add stability to any wooden table top.  Despite their simple appearance, designing breadboard ends takes some consideration.

Breadboard ends prevent the end of the top from cupping by restricting its movement via tenons.  Unfortunately, standard mortise and tenon joiner won’t do.  Wood expands and contracts more a long its width than a long its length.  Consequently, you can’t glue all of the tenons in place.  Otherwise, the top would pull itself a part.  So, how does one allow the wood to move while keeping the breadboard ends secured?  You simply pegs the tenons.

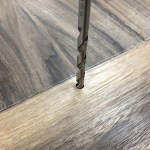
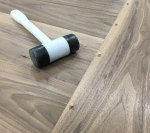
For this table, I made a total of five tenons at each end.  Only the center tenon is glue.  I draw bored the outside tenons with an elongated hole on the tenons (I wrote about draw boring in detail, here).  The elongated hole will allow the wood on the top to expand and contract, while the draw bore pegs keep the breadboard ends tight.  Unfortunately, I forgot to take a picture of the tenons.  Please, forgive me.

Driving the draw bore pegs always makes me nervous.  There’s a chance that the peg could split the breadboard end or break out the end of the tenon.  Fortunately, neither have ever happened to me.  In the end the risk is worth it.  The bread board ends look great, and keep the top nice and flat.

Stay tuned.

Click here for more on the Farmhouse Table Series.

Designing a Farmhouse Table

Some good friends of mine recently commissioned a dining room table.  They wanted a rustic farmhouse table: the kind of table that dominates Pinterest and built from construction lumber.  I wanted to build them something better.  So, Here is what I came up with.

Farmhouse Table

I will make the table and bench top from black walnut.  Furthermore, both will have draw-bored bread-board ends.  The customer wants to paint the base.  So, I will build it from less expensive lumber: likely poplar or maple.  I will assemble the entire table using loose tenon joinery.

While drawing plans for the customer, I also provided them with several options for details such as the legs.  In the end the customer went with the third option.

In the end, I believe the design of the farmhouse table was a success.  I hit a compromise that both I and the customer are happy with.

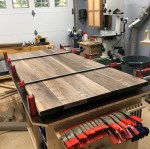
Consequently, I went ahead and purchased the walnut.  In fact, I finished gluing up the main panel for the farmhouse table top last night.

Stay tuned.

Part 2 – Making the Top with Breadboard Ends

Part 3 – Building the Farmhouse Table Base


The Tree Journal – Tulip Poplar (Liriodendron tulipifera)

Liriodendron tulipifera: that funky wood with the green streaks.  You might know it as poplar, tulip poplar, or the fiddle tree.  Poplar grows throughout the eastern United States, and reaches heights over 150 feet.  In fact, it is the tallest eastern hardwood.

General Description

Poplar grows quickly and prefers deep-rich soils.  However, it does not have many of the weakness issues seen in other fast growing species.  The largest examples reach over 190-feet tall and 10-feet in diameter.  Additionally, the trunk often climbs as high as 100 feet before the first branches appear.

The simple leaves alternate, and grow to 6-inches long and wide.  To my eye, the leaves resemble the profile of the tulip flower, which makes them easy to spot.  Like true poplar’s, Liriodendron tulipifera’s leaves flutter independently in the wind giving its canopy a bright appearance.  In the spring, the tree produces independent flowers which resemble that of the tulip flower and, small brown cones form late fall.

Uses for Woodworkers

Despite being a hardwood, poplar is quite soft.  As a result, it is easy to work with both hand tools and power tools.  It produces a cream colored heartwood with streaks of grey and green.  Sapwood is yellow or white and not always easily distinguished from heartwood.  The grain is uniform and straight with diffuse porous end-grain.

Tulip poplar’s wide availability means that lumber is quite affordable.  It is sustainable and doesn’t seem to produce severe allergic reactions.  It makes an excellent choice for those starting with hand tools.  It can produce nice furniture if you enjoy its non-traditional appearance.  However, furniture makers generally use poplar as a utility hardwood.  It is an excellent choice for hidden parts such as drawer sides.

Stay tuned for more!

Click here for the tree journal index.

The Bogg’s Shave Horse: Ratchet and Key

The placement of the ratchet key worried me.  If installed incorrectly, the lower jaws won’t work properly on the shave horse.  Unfortunately, I hadn’t received any good instruction on how to locate it.  In the end, I devised a good solution that I think will help anyone building a similar shave horse.  Keep reading to see how I did it.

Ratchet and Key

First, I built the ratchet, and installe the guide block.  This shouldn’t require much explanation.  Unfortunately, I hurried this part of the build.  As a result, it ended up much more difficult than it should have been.  Don’t be like me!

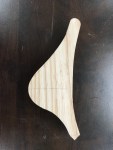
Next, I used a set of drafting curves to sketch out the shape of my ratchet key.  It needed to be long enough to easily reach the handle.  Mine ended up 8 inches long and about 4 inches high.  Then, I cut the key on the band saw and cleaned it up on the spindle sander.  I left extra material on the pin end, to ensure a tight fit in the ratchet.

To find the correct location for the key, I did the following:  First, I marked the center-line on the key and the point for the dowel.  Then, I placed the key on the base, and transferred the center-line to the base.  I also used the notches in the ratchet to mark the pin on the key (this is why I left extra material on the key, earlier).  Finally, I transferred the line on the base down both sides.

Next, I removed the ratchet and inserted the key.  I carefully determined how low I wanted the key, and marked a second line.  Then, I measured the distance between the second line, and the horizontal line for my dowel.  This determines how far down the dowel will pass through the base.  Finally, I transferred this measurement down each side of the base and drilled my holes.

I did not glue in the dowel.  I want to be able to remove it later, if necessary.  Instead, I waxed the dowel and drove it through with a dead-blow mallet.  Next, I will tackle the treadle and seat.  Stay tuned.

The Tree Journal – Chestnut Oak (Quercus montana)

Description

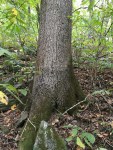
The chestnut oak grows in the eastern United states, and belongs to the white oak group.  It reaches from Maine, down to Georgia, and as far west as Mississippi.  It prefers well drained soil and inhabits ridge lines and rocky habitats.  As a result, it usually doesn’t grow more than about 70 ft tall.

The chestnut oak distinguishes itself from other oaks with its deeply ridged bark.  It produces large, broad leaves between 5 and 9 inches long.  The leaves are oval with 10-15 shallow lobes.  Additionally, quercus montana produces some of the largest acorns among the oak family.

Uses for Woodworkers

Chestnut oak produces hard, dense lumber with a medium to light, brown color.  The grain is coarse with medium to large pores on the end-grain.  Due to its propensity for low branches, the grain can be wild and knotty.  It has excellent resistance to decay and good work-ability.  Though, slightly more expensive than red-oak, chestnut oak is generally affordable.  However, lumber yards will likely lump it under general white oak.  Finally, chestnut oak is not know to produce any severe allergic reactions.

In general, lumber from quercus montana should produce excellent furniture.  Its low branches could increase difficulty in regards to work-ability.  However, it should also increase interest in flatsawn boards.

Stay tuned for more in tree journal series.

Click here for the Tree Journal Index

A Bogg’s Inspired Shavehorse: The Base

Somethings go as planned.  Others do not.  The base of my shavehorse followed the latter.  What seemed a simple, straight-forward glue-up ended up complicated and frustrating.  However, in the end everything worked out and the base is complete.

At first glance, the base seems simple enough.  Two sides, sandwich together with spacers between.  The rear legs fit into angled dados, and everything is reinforced with pegs.  However, the pegs fit somewhat tightly.  So, I was unable to do a full-fledged dry-run of the glue-up.  As a result, I ran into an unforeseen problem.

I lathered everything up with glue and went to town.  The front went together easy enough.  However, I immediately had problems with the rear.  First, I aligned both sides with the rear spacer, and drove the peg through all three pieces.  Then, I started with the legs.  Unfortunately, the legs fit a little too tight, so I started to drive them home with a dead-blow mallet.  After a few moments, I realized I wasn’t making progress.  Every time I drove the mallet, I was only shifting the legs; the space between them wasn’t growing any smaller.  I began to fear that I was running out of time.

Fortunately, quick thinking and just the right amount of panic led to a solution.  I clamped a stop on one side of the legs, and drove with the mallet from the other side.  When they were close enough, I used two clamps to cinch them the rest of the way.  Crisis averted!

With the shavehorse’s base complete, I will move on to the ratchet, key, treadle, etc.  Stay tuned.

Making a Boggs Inspired Shave Horse

Chair making deeply interests me.  The sensuous curves of a Maloof rocker and practicality of a ladder back captivate me.  Despite this, I have yet to build more than a few Adirondack chairs.  So, I signed myself up for Jeff Miller’s chair building class in November.  In the meantime, I decided to learn all I could about chair making.  Along the way, I determined that I would need a shave horse.

You use a shave horse to hold chair parts for shaping with a draw knife or spoke shave.  It consists of a seat and clamping apparatus.  A good shave horse allows the user to easily adjust clamping pressure, while maintaining a comfortable seating position

So, I scoured the Internet for information.  Eventually, I decided to build a horse similar to one Brian Boggs designed several years ago.  In case you didn’t know, Brian Boggs is a talented chair maker from Asheville, North Carolina.  His shave horse sits on three legs, uses a foot operated treadle, and clamps with an adjustable lower jaw.  Additionally, the user builds the device to suit his or her own body.

Shave Horse

I have already milled most of the lumber.  I have shaped the sides and started on the legs.  Once the base is complete, I will install the jaws, treadle, and seat.  If all goes well, I should complete the horse within a week.

Stay tuned for progress.

The Workshop Build: Lessons Learned

No matter how well you plan, there will always be things you’ll wish you’d done differently.  So, I’m here to share a few things I wish I’d done differently with my shop build.

Completed Workshop

Wall Space

Wall space is sacred.  If you’re limited on space, plan the locations of outlets and ducting carefully.  Make sure you have enough uninterrupted wall space for lumber storage.  I ended up with a few duct drops I wish I planned more carefully.  So, carefully catalogue everything you plan to store on the wall.

Headroom

Maintain as much headroom as possible.  There are one or two spots in my shop where I constantly hit my duct runs with lumber.  Why I didn’t run the ducting 6 inches higher, I’ll never know.  I will raise everything in the future as time allows.

Electrical

Don’t skimp on electrical.  Determine how many receptacles you need and then add 50%.  I thought I had planned for sufficiently, but I already wish I had more.  It’s always easier to do it all at one time.  In my case, it will be much more difficult to add any electrical now that the drywall is up.

What I did Right

  • Storage – I have plenty of it considering the small size of my shop.
  • Lighting – I installed plenty of efficient LED light fixtures.  So, there isn’t a dark corner in the shop.
  • Efficient Design – Placing my tablesaw and jointer in the center of the shop made for efficient movement around the shop.
  • Dust Collection – Dedicated ports keep me from disconnecting/reconnecting machinery and save time.
  • Air Conditioning – A comfortable shop ensures that I am able to work year round.  Installing it myself, saved me lots of money.